
This past year I had the opportunity to build a SIP and timber-frame house designed by architects Aamodt & Plumb and built in conjunction with Bensonwood Homes, the famous timber-frame company in New Hampshire. (Side note: I first heard of Bensonwood while watching This Old House in high school. It’s a dream come true to build a house with their timber/SIP package.)
Bensonwood has been using Zip System sheathing in their SIPs (Structural Insulated Panels) for a few years now, and has really liked them for several reasons.
Why use the Zip System?
1. Easy installation. Huber Zip is pretty darn easy to install for your carpentry crew. The tape they sell for sealing the seams is really top notch, too. I’m very impressed with this tape after my first project. It’s an easy system to learn because they aren’t as concerned about the shingle effect or where to layer things. Simply butt the panels and tape them.
2. Airtightness. I believe that airtightness is really the missing link in terms of efficiency for many builders across the country. This house we did with Zip System sheathing blew a very good blower door test. (Stay tuned to find the results.)
3. Labor savings. The Zip materials themselves come at a premium cost compared to some other “housewraps,” but the big savings with Zip happens with labor. A Zip System house requires one trip around the house compared to two with traditional systems.
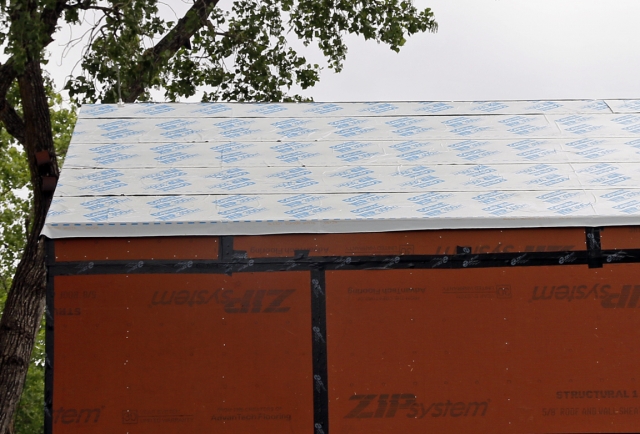
4. Early waterproofing. This is a big one for me, especially with the roof panels. Usually after my framers lay the plywood or OSB roof sheathing, I’m waiting a few days for the roofer to paper the roof for a temporary waterproofing till they come back to install the roofing. With Zip, you have them deck the roof and tape it the same day! Drying the house early in the framing process is really nice, and frankly pretty important if you’re building a house in under 6 to 9 months.
Using Zip
After using Zip on my first house, I’ve become very comfortable with the system overall. But I think there are some small modifications that need to be made to ensure maximum durability of your house for the next few hundred years. Let’s look at this Bensonwood project to see how we modified the Zip system to suit my desire for ultimate durability.
Tip #1: Peel-and-stick roofing underlayment is key
Early dry-in with Zip tape is great, but I’m a big believer in installing a full Ice & Water Shield product on your roof as underlayment, especially if you have an unvented roof assembly.
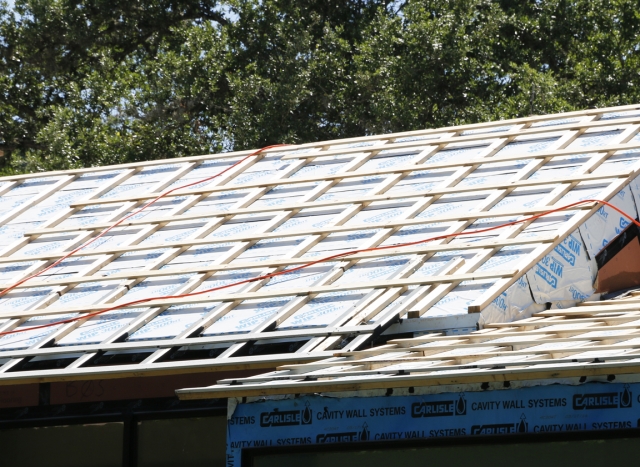
This SIP-framed roof has 12-inch I-joists filled with cellulose insulation, and I need to ensure they stay dry for the life of this house. I typically use Carlisle’s WIP 300HT for my roof underlayment. This 40-mil product is rated for high temperatures and has some self-gasketing abilities.
The peel-and-stick underlayment overlaps the Zip wall panels by about 3 to 4 inches. To create overhangs on this house, the architects designed a very cool “over-roof” with 2-bys.
The roof has continuous ventilation under the metal from eave to ridge.
Tip #2: Install base wall flashing
In almost every house I remodel, I find rot at the base of the outside wall sheathing. I believe you must use a base wall flashing to protect the raw edge of whatever sheathing product you use.
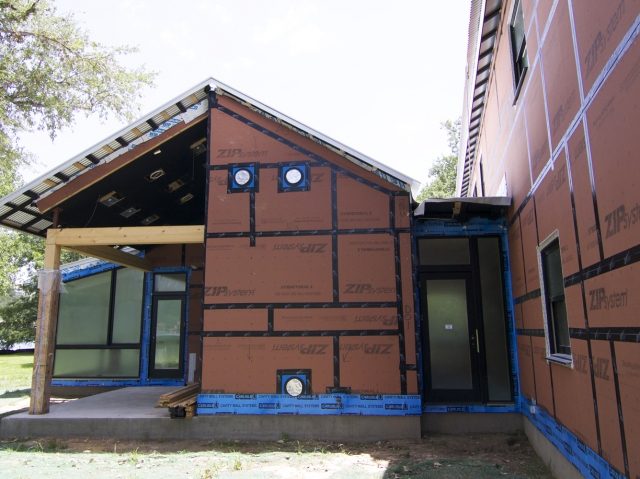
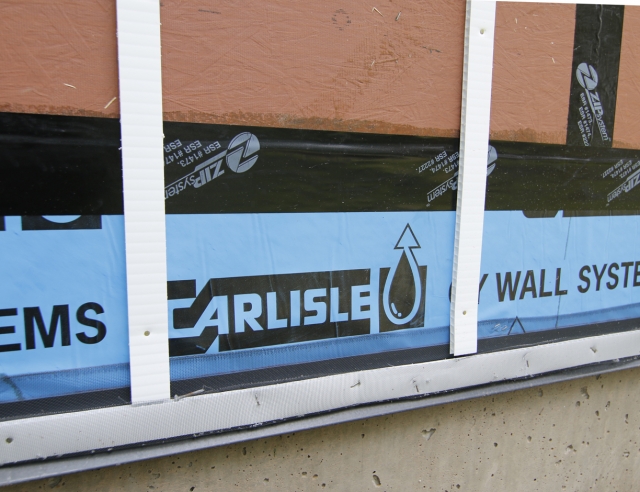
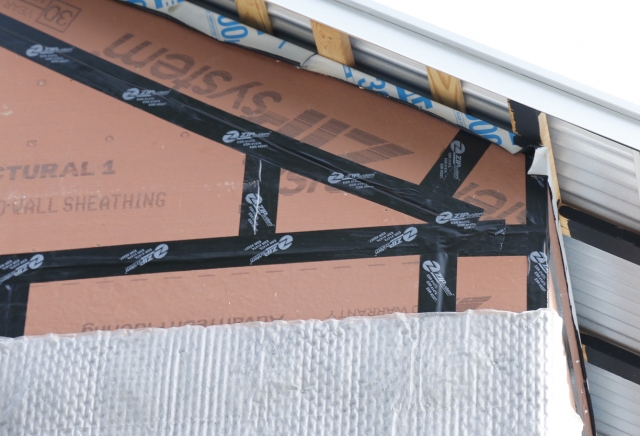
I’ve used Carlisle’s CCW 705 for a few years now. (Here’s a link to a blog post for more information about how to use CCW 705.) You’ll see that we used Zip tape on top of the Carlisle 705 to ensure it would stick properly to the Zip wall. That gave us about 16 inches of extra protection at the bottom of this slab-on-grade house.
This blue base wall flashing will add tons of durability to your Zip house.
Tip #3: Create a rainscreen gap behind all your claddings
The rainscreen approach calls for an air gap behind your cladding (siding, stucco, brick, etc.). In my opinion this air gap makes a huge impact to the durability of your house.
Any water that gets behind your cladding will encounter the air gap layer that encourages drainage and drying. Simple — yet it’s rarely done in this country. If you build with Zip and add an air gap (a rainscreen), I expect your house to be in great shape 100+ years from now.
This house has a mixture of stucco and wood siding, so here’s how we got a rainscreen air gap.
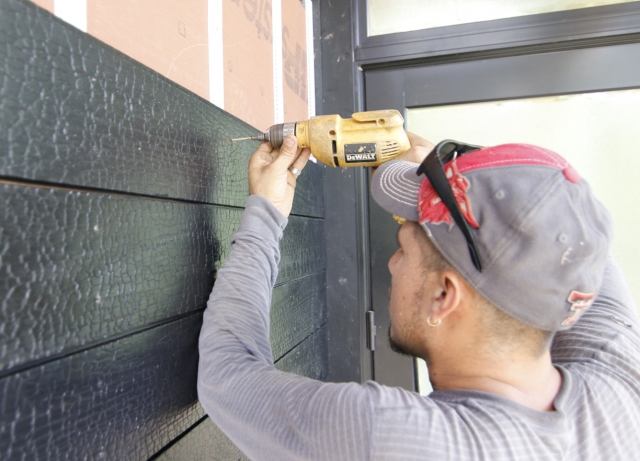
The 3/8-in. rainscreen gap behind the wood siding was created by Cor-A-Plast battens with a folded over insect screen at the bottom. This wall is ready for siding.
Face-screwed siding makes it really easy to pull the siding off later if we ever had a reason. The wood siding has a charred finish called shou sugi ban in Japan.
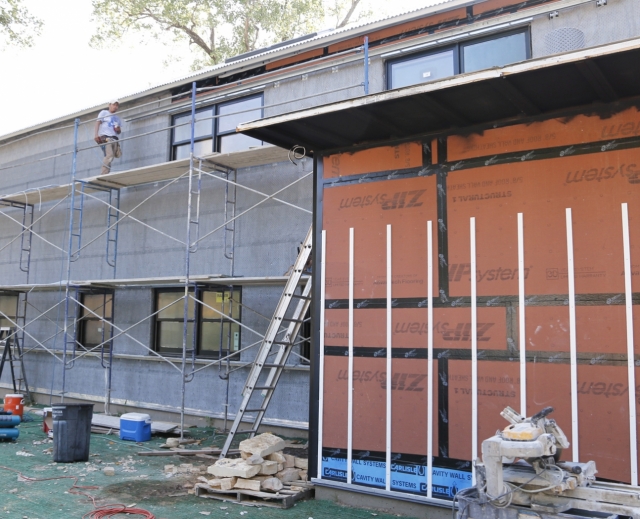
In the photo below, the furring strips on the wall on the right will be covered with wood siding. The drainage mat (Delta Dry Stucco & Stone) on the left wall will be covered with stucco.
For a more in-depth look at Delta Dry’s rainscreen system for stucco, follow this link to a blog post from earlier this year.
Follow this advice and I think you’ll find that Zip is a great system. By the way, this house blew a 0.92 ach50 in our blower door test! Just shy of the Passivhaus standard and five times tighter than code requirements for Austin, Texas.
I like an exterior taped system — especially when I can add my extra tips for durability!
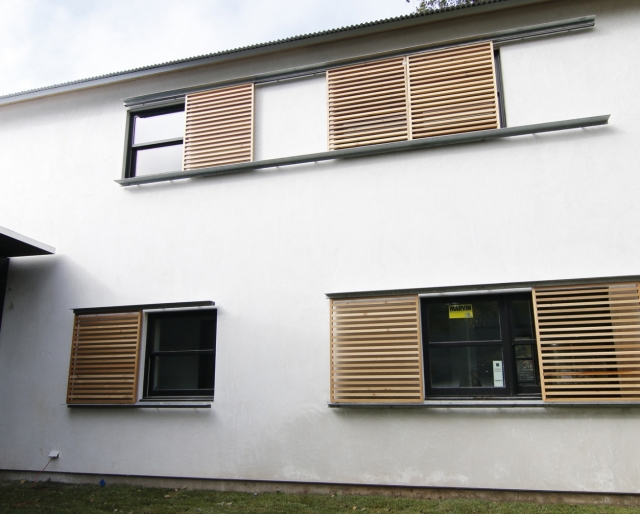
Here’s what the traditional three-coat stucco with LaHabre integral color finish looks like. The rolling cedar shades look awesome!
P.S. I didn’t make a specific mention of this in my list of tips, but remember always to set your windows with a sill pan underneath. Zip has directions on their site for making window sill pans with their products, or you go with my standard method using DuPont Flexwrap. No matter what your choice of materials, never rely on face sealing alone for windows. Make a pan so any future window leaks will drain to the outside and not get into your structure.
_________________________________________________________________________
Matt Risinger is a custom builder and whole-house remodeling contractor in Austin, Texas. Photos courtesy of author.
Weekly Newsletter
Get building science and energy efficiency advice, plus special offers, in your inbox.





22 Comments
Peel-and-stick roofing underlayment
Matt,
Thanks for a great blog, and thanks for sharing your excellent photos.
My only quibble concerns your choice of roofing underlayment. Since the roof assembly includes an excellent ventilation gap between the underside of the metal roofing and the underlayment, it seems to me that it would have made more sense to choose a vapor-permeable underlayment (perhaps asphalt felt, VaproShield SlopeShield SA, or Delta-Foxx), so that the roof sheathing would be able to dry to the exterior if the roof sheathing ever gets wet.
The vapor permeance of your chosen underlayment (Carlisle WIP 300HT) is only 0.02 perm. That means that your roof assembly can't dry to the exterior -- meaning that one of the best features of the ventilation gap (outward drying) is not available.
Question for all. What are the thoughts on ASTM E 2273? In regards to zip sheathing?
If ZIP can perform well enough why are we still designing in rainscreens?
Azad,
Can you expand on your question a bit? ASTM E 2273 measures how much water drains from the bottom of a wall assembly. The problem is probably mine, but I don't see how it applies to zip sheathing.
Thanks, Malcolm,
I have heard some builders saying that a Rainscreen is not necessary b/c zip sheathing does a great job (with its textured surface) of acting like a rainscreen. I don't think it provides that air gap but it provides enough to break capillary action and allow the water to run down and out.
I will just post the excerpt here.
"There is an exception to the requirement for a rain screen. The additional step of creating a gap between the cladding and WRB can be eliminated if the WRB is manufactured in a manner that results in 75 percent or greater drainage efficiency, in accordance with ASTM 2273. ZIP System® sheathing and tape is an alternative to traditional sheathing and housewrap that helps Oregon builders comply with code requirements by streamlining materials and installation. The unique built-in water-resistive barrier integrated onto the ZIP System® sheathing surface achieves greater than 90 percent drainage efficiency, according to third-party report UEL-5010 publishing ZIP System sheathing compliance with ASTM E2273 requirements"
https://www.sbcmag.info/news/2017/nov/huber-discussed-impact-oregons-new-rainscreen-requirement
Azad,
There is a hierarchy of rain-screens starting at textured WRBs and ascending to full cavities vented top and bottom. As you go up they have more useful attributes: Capillary breaks, a drainage path for bulk water intrusions, redistribution of moisture by diffusion, and ventilation to aid drying.
Of those I'd argue the corrugations of Zip provide only a drainage path - and of all the things rain-screens do, I think that is the least used function. In many climates that may be enough. Perhaps there are areas of Oregon where that is true. In general though I think it's a real stretch to assume Zip provides anywhere near enough of the useful attributes to assume it's doing an appreciably better job than ordinary plywood or OSB sheathing. So for me, in situations where rain-screens are necessary for the resilience of wall assemblies, relying on Zip is a mistake.
vs perfect wall?
You did a youtube video about a "perfect wall"; how would you compare the cost effectiveness of that design to using zip wall?
Great seeing how some
Great seeing how some thoughtful home builders are working hard to improve energy efficiency for the homeowner and community but...
How long do these sealing tapes work? Maybe quick and easy for a builder but how about the homeowners years from now. Kanda hard to replace sealing tape. A quick check on a major brand's web page show a warranty for just 10 years. I plan on living in my house for many times longer than that without removing my siding. Some very well built homes in tough climates in the US have siding that has lasted well over 100 years.
Any studies on this or is the product to new?
Martin - P&S Debate
Martin,
This is where the great debate is with building scientists. I have spoken to at least 6 building scientists who have PhD's and know their trade. Out of those 6 experts, 3 of them believe it is best to use peel & stick roofing membranes on a SIP roof. The other 3 believe like you do. The ones who believe in the P&S method state that the #1 goal of a SIP roof is to PREVENT moisture from infiltrating/touching the OSB/skin surface. This cannot be accomplished by using "breathable" underlayments because they are self-defeating. They allow the OSB skins to get wet and that is what you don't want to do.Yes, these underlayments are supposed to "breathe" but rarely do and if they do the rate is so slow that it doesn't help to dry off the skins fast enough to prevent rot.
So back to square one. Why allow the roof SIP skins to get wet in the first place? P&S will prevent any water from penetrating the membrane and getting into the SIP skin.
I was told there are ZERO real long-term studies with "breathable" SIP roof membranes and how or if they are effective in preventing SIP skin rot/damage. It is all theoretical. The studies that are out there from people like Joe show that "SIP rot" was caused by INTERIOR moisture drives through the SIP joints and the water vapor would condense at the cold roof SIP joints since they were NOT air tight. Making SIP joints airtight was the solution to the problem of "SIP rot" and NOT because of roof membranes that were non-permeable.
Now, if you have a long-term study showing a properly air sealed SIP roof that had a non-permeable roof membrane that suffered rot vs. a permeable roof membrane that did not. I would like to see that study. Otherwise, as the building scientists I spoke to said, it's all theory and there are no long-term studies.
Couple questions
1. Not that I would plan to spend much time on my roof, but out of curiosity, how "walkable" is a metal roof with the metal roofing resting on furring such as how this one is built?
2. To what extent is the ventilation furring necessary when building an unvented roof? I've seen examples where there was no ventilation between sheathing and roofing? Does having metal roofing change the ventilation requirements?
Not your typical SIPs....
Nice write up!
My first thought was the same as Martin's-Why not allow the sheathing to dry to the exterior with that nice batten, counter batten roof assembly? Isn't this is even more important when you consider that these SIPs are made with I-joists and cellulose filled.This is not a typical SIP panel 'round these parts... I know un vented roofs with cellulose have been discussed here and that the jury is still out on whether or not this is a long term durable approach.Not to mention code issues... I don't do it as I have enough trouble sleeping;)
I had the brief opportunity to ask Dr Joe about this very type of assembly and unless I misheard, he felt strongly(surprise, surprise) that if the cellulose is in contact with the roof sheathing it is best to vent ABOVE the sheathing. Obviously this requires a vapor permeable underlayment as Martin suggests.
Roofing & Underlayment
Martin,
I believe that in my Hot/Humid climate that an unvented roof assembly needs the extra protection afforded by a 40 mil Peel & Stick membrane. I'm also using Dehumidifiers inside my houses to maintain RH around 50-55% year-round. This house has the new SD-12 from Ultra-Aire. I want that roof SIP to remain dry and not get wet so I use a more "bullet-proof" underlayment. If you are in a Northern Climate you might see what the guys at BuildingScienceCorp have to say about underlayments.
Antonio Oliver,
The roof we used is a 22ga ribbed pattern and even with the elevated batten is very rigid to walk on. I often use 24ga with 1x4 battens and that is also easy to walk without denting.
Regarding your furring question, I always vent my metal roofs. I've seen underlayments (even high temp versions) literally fry from the heat of our Texas sun. Elevating your metal roof is a must in my opinion.
Appreciate the willingness of GBA to put my blog post on your site. I'm humbled to be posting among such giants of the industry!
Best, Matt Risinger - Risinger Homes in Austin, TX
Matt - Cellulose Roof SIPs?
What are the advantages of cellulose roof SIPs over more traditional foam SIPs? Cost, structure, other?
Sipping?
I always thought of SIPS as meaning that the panel itself was structural, but here it sounds like the i-joists are the structural part, right? It's kind of a modular assembly? What's on the interior of the panel - drywall?
And was this house in Texas or New England? Just wondering if you needed to consider either snow load or uplift for the overhangs.
SIPs
SIPs are basically Structurally Insulated Panels. They TYPICALLY refer to a layer of insulation, usually EPS or polyurethane, sandwiched between two skins (usually OSB or steel). The panels themselves are structural and can free span numerous feet. They are like an "I beam" and are a one-in-all panel that is structural, insulation, vapor barrier and sheathing.The EPS or PU is what gives the panel it's strength when it is laminated between the two skins.
These "SIPs" described in this article are the first time I have seen something like that. The joists within the panel described in the article are the structural element, not the panel itself.
SIPS
Great write up Matt, I'm glad you are sharing.
There are many comments here and great thoughts.
I hope to clear up a few:
The first thing to recognize here is the type of SIPS we are talking about.
There are SIPS as structural units vs. structure within our panels
We are speaking of the type that has a foam core between two layers of OSB.
The R 44 roof system from Bensonwood is a 11-7/8" I- joists with a 1/2" OSB skin to the inside,(taped and sealed), 5/8" ZIP to the out,(also taped and sealed) and Dense packed with Cellulose.
I believe both the inner skin and outer skin are classified as semi-permeable layers, meaning that both sides are acting as a great air barrier as well as good vapor control layers.
Being that this assembly is in a hot and humid climate, I am glad to hear that you have installed the Ultra-Aire SD12. This should mitigate the moisture entering the panel assembly from inside the house, and not having it dry to the outside. A key part of this assembly, of course, is to keep the moisture from getting into the panels in the first place. I think we have helped deter this with the inside layer of OSB and tape. Now that we are more accustomed to installing mechanical systems,(not a bath fan) we are able to control the humidity in our building envelopes in many climate zones.
Addressing the differences between the Foam core SIPS, and Bensonwood's R44 roof systems:
Foam vs Cellulose. There is a lot of debate here, of course. The great thing about foam is the insulation value.
The great thing about Cellulose is it performs closely with the rest of your building. What I mean is that it is made from wood fibers, which is what a good portion of your building envelope is made up of. It also fills all voids, and it does not matter what shape. When your building decides to move( yes, it moves) it will move with it, without cracking and making voids. This happens to be a great place for air and water vapor to escape.
Cellulose, of course, is a reusable material.
SIPS are very expensive, but very fast to cut and install.
The layers of the R44 are more cost effective, but also labor intensive to build. However, once built into a panel, it gets installed just like a SIP and is just as fast when raising onsite.
Thank you for letting me join in the fun conversation.
I hope it was helpful.
rolling cedar shades
Matt, are the rolling cedar shades custom made or is it a product available on the market? Either they are awesome.
Thanks
Air gap under metal roofing
With the wood frame over the roof decking you have +/-3" of open air gap. How do you keep small birds and insect colonies from moving into this space? You mentioned screening at the bottom of the wall siding air gap but said nothing about this much wider gap at the roof line.
Zip roof sheathing for walls?
Matt, is there a reason you're using the Zip roof sheathing for your walls?
Rolling Cedar Shades
Hi Phillip, I was the PM on the job for Risinger. Thank you for the comment on the blinds.
The shades were fabricated by our carpenters offsite. We made them out of an Architectural Select Western Red Cedar. The slats are slanted at a 5 degree angle and we created a jig to make the cuts. The slats are glued and screwed through the ends in a mortised pocket that we then edge-banded so that no fasteners were visible. The sealer is MasterClear Supreme by Modern Masters which doesn't darken the wood or gloss it up. Maybe we can talk Matt into doing a post on them, the entire assembly was a lot of fun to make!
zip tape at panel joints
Looking at the zip tape locations on pictures above, the zip panel joints don't always seem to be aligned with studs. Is that acceptable, as long as they're not shear walls? At shear wall locations where furring strips are installed for wood siding application, I have a little concern about the tape, because they can be punctured by fasteners at numerous points, where there's no backing material (panel gap), leading to potential leak. Am I reading it improperly or should I not worry too much about it?
Response to Earnest Green
Earnest,
Concerning whether you need blocking at sheathing seams that don't fall on your framing: the answer depends on the seismic and wind loads that your building is designed to resist. If you have any questions on this issue, talk to an engineer or your local building department.
Concerning the issue of possible air leaks or water leaks at fastening penetrations: I don't think that you have anything to worry about. Very little (if any) leakage will occur at fasteners, so I don't think this is a significant problem.
Zip tape at panel joints
Thanks Martin, I realized that the example house is a SIP shell; no wonder the panel joints seem to be laid out in a random fashion. I noticed some builders use the Zip's Liquid Flash to seal the panel joints instead of their tape. I wonder how that performs compared with the tape seam.
Log in or create an account to post a comment.
Sign up Log in