Image Credit: All photos: Stu Turner
In the fall of 2014, I was approaching the rough electrical stage of construction on a (hopefully) net-zero-energy “pretty good house” in the mountains northeast of Los Angeles. My goal for lighting was to specify fixtures to create attractive, properly lit spaces, with minimal impact to my air barrier.
My original plan was to specify recessed can lighting throughout the house, and then to install LED retrofit kits after drywall. But even though it was late in game, I found myself struggling with using recessed can lights upstairs. On the one hand, I preferred to use the same recessed lighting throughout the house for a continuity of design. However, my air barrier on the second floor was a taped sheet of poly behind my ceiling drywall. I was not optimistic that I would be able to properly air seal the “airtight” IC-rated cans, even with the integrated LED trim, which seems to create a decent seal at the drywall. Nor did I like the idea of the cans intruding halfway through my attic insulation (18 inches of blown cellulose).
The GBA article announcing the new SlimSurface ceiling-mounted LED lights from Phillips couldn’t have come at a better time for me. First, I liked their sleek design, which seemed a more elegant lighting solution than installing retrofit kits on newly installed can light housings. But more importantly, the SlimSurface LEDs seemed to be an opportunity to minimize the impact on my ceiling air barrier and insulation layer.
So what is a SlimSurface light?
SlimSurface is Philips’s new line of LED fixtures that can mimic the look and function of recessed lighting. These integrated luminaires (they are a fixture with no removable bulb) are only 3/8 inch thick, so while they are not as flush to the ceiling as most recessed lighting trims, in my opinion they looked similar enough.
They are installed in a standard J-box, so while I would still have to cut a hole in my air barrier, I imagined it would be a lot easier to air-seal a single J-box than an entire can housing. Plus, standard J-boxes would not intrude into my insulation layer. So in the eleventh hour, I decided to jump in and go with the SlimSurface lights throughout the entire house, everywhere I had originally specified cans.
The small size looks similar to a can light
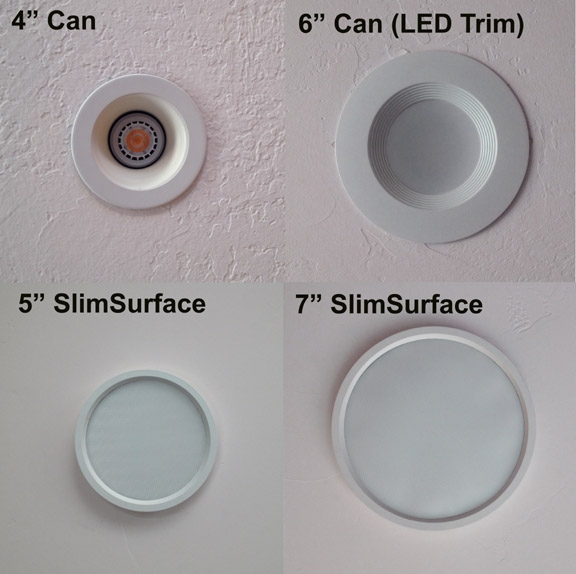
Round SlimSurface lights come in two nominal sizes, 5 inch and 7 inch, and come in either white or aluminum trim. I found that the 5-inch size had the look of a can light. Its diameter measures about 5 3/8 inches, which is only 3/8 inch bigger than the trim for a 4-inch can.
Although the 7-inch nominal light had an actual diameter of 7 7/8 inch, this was not too much different than the LED retrofit bulbs I have installed in my existing home, which have 7 1/2 inch diameter trims (yet only 3 3/4 inch diameter lights). However, the 7-inch SlimSurface lights really looked huge compared to the normal cans because the lighting element was so large.
A little tricky to install
The lights install into a standard box, in my case 3 1/2 inch round standard-depth lighting J-boxes. The 5 inch round fixtures can also fit in 4 inch octagonal boxes. The 7 inch round fixtures have the most options for boxes: 3 1/2 inch round, 4 inch octagonal, or 4 inch square.
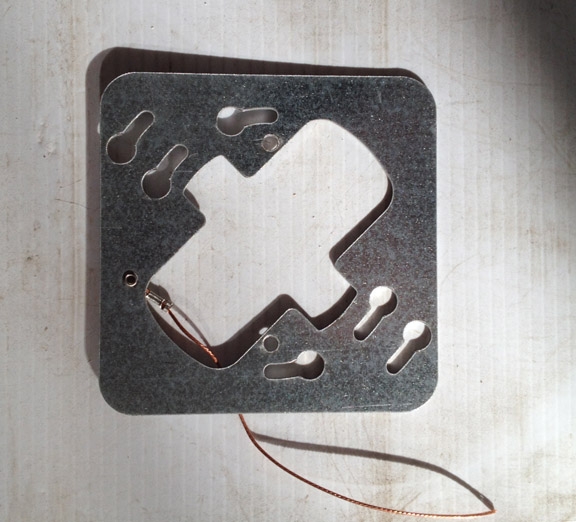
Each light comes with a sheet-metal bracket that is screwed into the box with two standard screws. After being wired, the luminaires snap into the brackets using two wire clips on the back of the light. The tension holds them in place tightly, and they require a forceful pull to pry them out. However, like a can light trim, I found some fixtures ended up being tighter and more flush to the ceiling than others.
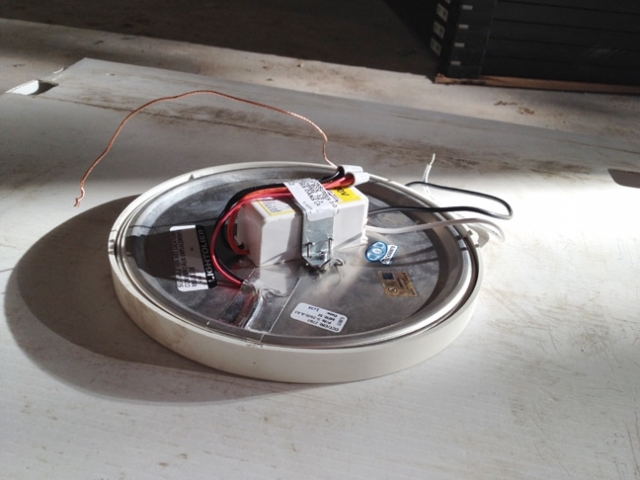
One reason the luminaries are so thin is that they have an integrated driver/heat sink that protrudes from the back of the light, which is recessed into the box upon installation. This made installation a bit tricky, because there is not a lot of room left to fold the wires back into the box as you install the lights. We discovered that you needed to cut your wires fairly short in order for the light to completely snap into the bracket. In some instances we were able to get the fixture to snap into the clip, but the pressure of the folded wires behind the fixture didn’t allow it to sit totally flush with the ceiling. And with the short wires you have less room to reach in and guide the wires out of the way as you push the fixture into place.
Even so, after they were installed, I talked to my electrician Glenn Yarber and asked him for his overall opinion of installing the SlimSurface lights. He said they were a little tricky but nothing he would complain about, and he would have no problem installing more in the future. However, in the future he would go with 4-inch octagonal boxes to give himself more room for wires.
Cost-effective, but there are cheaper alternatives
At this point, the SlimSurface lights cost more than installing recessed can lights with retrofit LED bulbs. Through online retailers you can find single 5-inch SlimSurface models for around $47, and 7-inch for around $52. That is about 10% more than what I paid when I ordered my lights from LED Source, but then again I ordered 40 total lights.
Meanwhile you can buy an “airtight” 6-inch can rated for insulation contact for under $10. And the retrofit kits are generally in the $30 range at home improvement stores (sometimes even $15-$20 on special). According to my electrical contractor, he did not believe there would be much of a labor difference between installing cans (with owner-installed LED retrofits), versus J-boxes with electrician-installed SlimSurface lights.
Now that I have power in the house, I really do like these lights. Like most LEDs, they turn on and off instantly and provide a nice warm light (I got 2700 K warm white). They dim without flickering down to about 10% of their lumen output. I still have a while before my final blower-door test, but hopefully these lights help me come in below my goal of 1 ach50.
SPECIFICATIONS
SlimSurface round fixtures
Lifetime: 50,000 hours
Warranty: 5 years
Dimmable? Yes
Wet location approved? Yes
Certifications: Energy Star certified
Light quality: 80 CRI, 2700 K or 3000 K
Lumen output, 5-inch fixture: 650 lumens (10 watt draw, or 65 lumens/watt)
Lumen output, 7-inch fixture: 1,000 lumens (14 watt draw, or 70 lumens/watt)
Stu Turner, M.S. Architecture, is an occasional environmental science T.A. at the NewSchool of Architecture + Design. He currently building a “pretty good house” in Big Bear Lake, California.
Weekly Newsletter
Get building science and energy efficiency advice, plus special offers, in your inbox.


10 Comments
stranded wire vs solid
I assume they were using romex? I wonder if stranded wire would be easier to get out of the way in the box compared to the normally used solid in romex. Of course that would mean flexible or rigid conduit to run the stranded wire in to the boxes.
RE: stranded wire vs solid
Yes Steve, you are correct, they used Romex
Cooper Halo
We just installed about 40 of the Cooper Halo surface mount LED fixtures in a retrofit application for about $45 each and they are awesome! Great light quality and reasonable price. Highly recommended. They look a little more like a traditional can than the ones shown here.
Cramming wires
A lot of people subscribe to the "choose the cheapest box possible" policy. If you look at the options there are multiple volumes available for each ceiling box diameter. I spend the extra 25 cents for the larger volume as it will reduce the effort of cramming wires. This is especially true where you've got Romex coming in and going out to the next box.
With a larger box and by putting your lights on a dedicated 15A circuit with 14 guage Romex it shouldn't be that hard to get the wire up into the top of the box.
But I have to say, I'm a bit weirded out by having a heat sink up inside of the box. Is that really approved? Amazing.
BTW, I've been using those "LED Flat Lights". They provide a broader light source and don't stick up inside of the box. I've never seen the attraction of can lights, though they had their uses until LED lights came along. I suppose can+trim is cheaper for the contractor than box+external fixture.
Light quality
I had intended to use some fixtures similar to these in an application I was working on. I did a test run by holding up the lights and the customers quickly decided they were not for them. We both found the light to be "flat" looking, much like fluorescent lighting, plus the light was not recessed enough and hurt the eye. This was for a family room living area and the customer felt it made the space look too commercial, almost office like.
My customer opted for 4" recessed cans with a halogen like LED bulb. A sharper light that created pools of light and shadow.
Sealing the air barrier
Don't you still have air barrier issues as air will leak through the J box? How will you air seal the boxes? Is there some type of gasket on the fixture? I cannot see from the picture. I see a low profile advantage from the viewpoint of attic insulation but still wonder about air leakage.
RE: Sealing the air barrier
Hi DL, you are correct about air leaking through a j-box. I climbed into the attic and sealed all around the boxes with spray foam, before the blown cellulose was installed over them. Since they are pretty small this didn't take much time, or foam.
Light quality / visibility
Make sure you try a few of these before doing a room or a whole house. They are very visible .. and IMO not very nice. With a recessed -- the light source can be hidden -- not these. Not much different than having fluorescent light all over the house. Only the high end LED's dim to match an incandescent -- LED's stay the same color as they dim -- this is a strange effect in a multi light source room.
I'm doing an air sealing HVAC project on my place in NJ under the clean energy program -- these were an option to seal the second floor. I am also doing a new build using the aclux line of LED's from Juno ... they are expensive but replace a true halogen look.
In the years since this blog, the price of these slim surface lights has come way down. I installed more than a dozen in the addition to my house three years ago. The light is very pleasant and dimmers work well. And of course they avoid the problems of canned lights reducing the value of the insulation in your ceiling.
There is only one disadvantage. After a year one of the lights failed. The exact model I had purchased was no longer available, though it was a major brand, Phillips. It took several hours of research and half a dozen phone calls to identify the equivalent model -- many of the lights are in the same ceiling and I did not want one to look different. However eventually the manufacturer identified the appropriate model and sent it to me under their generous warranty. Of course it still had to be installed.
In general I would much prefer Edison base LED's, because if one dies then replacement is quick and easy. However for ceiling lights that wouldn't work. If I were doing it again I would buy a couple extras for the eventual inevitable failures.
I have a question on canned lights. I have followed your articles and understand the negative aspects of using them bc of energy loss. But do those negatives only apply to ceilings in the top floor? So, if I for instance wanted to use canned lights in a ground floor kitchen or basement, as long as I didn't use them in the second floor ceiling, I'd be good, correct?
Log in or create an account to post a comment.
Sign up Log in